BSP (Boot Strap Processor) and AP (Application Processor), these two abbreviations are the name of the processor in the MP architecture. When the multi-processor architecture is initialized, the hardware first selects one of the multiple CPUs according to a certain algorithm as the BSP to guide the initialization of the entire system, and the other CPUs belong to the AP.
BSP first completes its own initialization, and then enters the process of starting the AP. BSP first copies the startup code of the AP to a fixed location in the memory, and sets parameters for the startup of the AP. Then send a SIP (Start Inter-Processor Interrupt, SIPI for short) interprocessor interrupt to wake up the AP to a fixed location in the memory to execute this startup code. After waking up the AP, the BSP will enter the spin waiting state. When the AP initialization is complete, it will notify the BSP to unspin, and then the BSP and AP will execute subsequent procedures in parallel. This process can be seen in Figure 0-1.
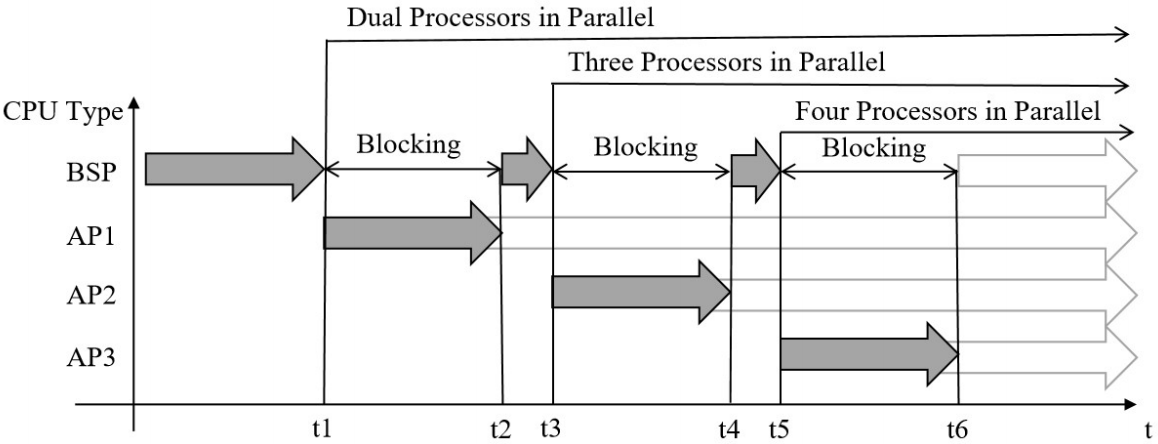
Figure0-1 AempOS manipulates the hardware in a multiprocessor architecture, resulting in a shared kernel for all CPUs and parallel access to the operating system programs.The gray arrow in the figure indicates that the startup program is executed, and the hollow arrow indicates that the operating system program is running normally after the initialization is completed.
Take BSP waking up AP1 as an example: before t1, after BSP completes its own initialization, it copies the startup code of AP1 to a fixed location in the memory, and sets parameters for the startup of AP1. At time t1, BSP wakes up AP1 by sending an interprocessor interrupt, and BSP enters a spin waiting state while sending an interrupt. AP1 executes its own startup code and initialization routine between t1~t2. After the execution of AP1 is completed, at time t2, AP1 completes the initialization process, sends a signal to unlock the BSP, and then AP1 runs the operating system program normally. Note that the system enters the dual-core parallel state of BSP and AP1 at this time, where BSP continues to wake up AP2, and AP1 has entered the shared kernel program. The awakened BSP wakes up AP2 again through the same process, and AP2 also completes its basic initialization between t3 and t4 through the same process, and then sends a signal to unlock the BSP at t4. And so on. After the BSP wakes up all the CPUs, that is, at t6, the BSP also continues to execute the shared kernel program. After that, it enters the quad-core parallel state, and all four cores run the operating system program normally. So far, both BSP and AP have completed startup and initialization.
Lab0-1 MP system initialization
The BIOS in the MP (Multi Processor) system will automatically generate an MP configuration table global data structure during power-on self-test. The BIOS puts it in its own Extended BIOS Data Area (EBDA), where EBDA is an absolute address area (400h-4FFh) in the memory. The kernel accesses this data structure by accessing this absolute address, and then multi-core operation The system will complete all the initialization of the MP system by operating this data structure. For example, AempOS can obtain hardware information such as CPU, IOAPIC chip, and system bus in the current MP system by traversing this data structure.
1. Principle
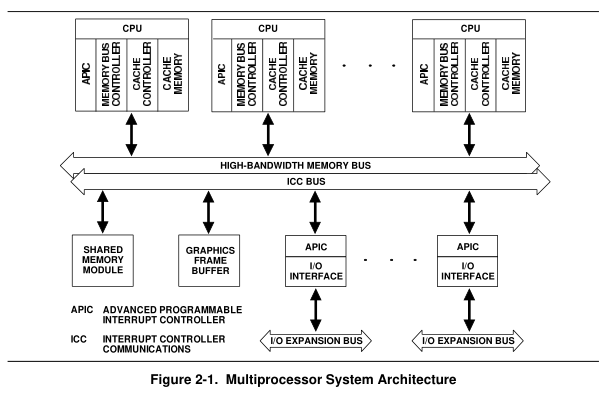
First give a conceptual diagram of the Multiprocessor System Architecture of the multi-core system architecture:
The first step to be done when the MP system is started is to abstract the MP system architecture (hardware) into a data structure that is easy to operate in assembly language and C language. How to abstract the entire MP architecture into a data structure that is convenient for C language programming? According to Intel MultiProcessor Specification Version 1.4, the method is to establish a global MP configuration table data structure through BIOS power-on self-test.
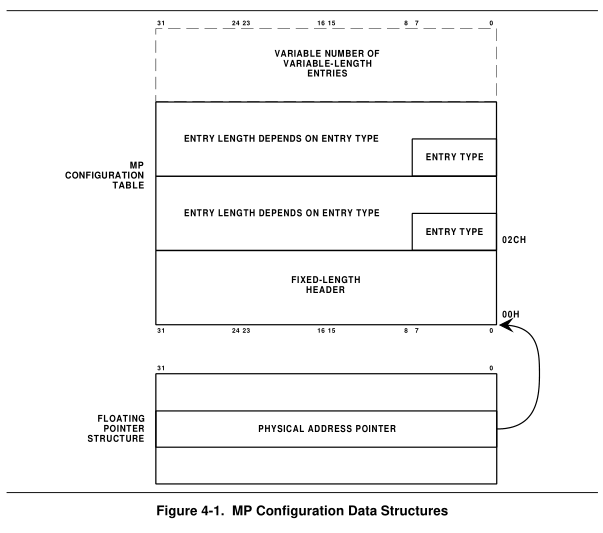
The MP configuration table is established by a BIOS and contains all components in the entire MP system, in order to provide a global data structure for APIC and other machine information to the multi-core operating system. The BIOS puts it in its own Extended BIOS Data Area (EBDA), where EBDA is an absolute address area (400h-4FFh) in the memory, so that the operating system can easily access the data by accessing the absolute address of the memory structure.
When AempOS is initialized, the most important thing is the MP configuration table. The starting address of the MP configuration table is pointed to by *physaddr of the MP Floating Pointer Structure (MP floating point structure, struct mp in AempOS). Therefore, in the initialization phase of the multi-core operating system, when the function of obtaining machine information (the mpinit function in AempOS) is executed, the first step is to find the MP float established by the previous BIOS in its Extended BIOS Data Area (EBDA). Point structure (struct mp in AempOS), so as to find the MP configuration table that plays a key role in the subsequent initialization part through the MP floating point structure (struct mp in AempOS).
MP configuration table consists of Header and multiple Entry, as shown in the figure below. The Header includes the description information of the entire table, and the Entry has five types, namely: MPPROC, MPBUS, MPIOAPIC, MPIOINTR and MPLINTR (named from xv6). All components in the entire MP system can be represented by these five types. In AempOS, only the structures of MPPROC and MPIOAPIC are set, which are struct mpporc (include/mp.h) and struct mpioapic (include/mp.h).
The system first searches for the MP floating-point structure:
- If the BIOS extended data area (EBDA) has been defined, then search in the first K byte, otherwise go to ②;
- If EBDA is not defined, search in the last Kbyte of the basic memory of the system;
- Search in the address space from 0xF0000 to 0xFFFFF in the BIOS ROM.
The MP floating-point structure contains a pointer to the physical address of the MP configuration table header (Header). The MP configuration Table consists of a Header (basic part) and multiple Entry (extended parts). The basic part is the header (Header), and the extended part (multiple Entry) follows the header. The program traverses the MP extension part (multiple Entry) in the mpinit function, and performs corresponding operations by judging the entry type.
2. To do
Add files cpu.h, mp.h, mp.c.
Reference data structures and interfaces:
Abstraction of cpu
1
2
3
4
5
6
7
8
9
10
11
12
13
14
15
16
struct cpu {
u8 id; //Local APIC ID; index into cpulist[] below
struct GDT_PTR *gdt_ptr;
DESCRIPTOR gdt[GDT_SIZE]; //added by mingxuan 2018-12-22
TSS tss; //added by mingxuan 2019-1-21
int started; // modified by mingxuan 2019-4-1
struct ready_queue ready; //modified by mingxuan 2019-4-3
int nr_ready_proc;
// Cpu-local storage variables
struct cpu *cpu;
PROCESS *proc; // The currently-running process.
};Abstraction of MP floating point structure
1
2
3
4
5
6
7
8
9
10
struct mp { // floating pointer
u8 signature[4]; // "_MP_"
void *physaddr; // phys addr of MP config table
u8 length; // 1
u8 specrev; // [14]
u8 checksum; // all bytes must add up to 0
u8 type; // MP system config type
u8 imcrp;
u8 reserved[3];
};Abstraction of MP configuration table
1
2
3
4
5
6
7
8
9
10
11
12
13
14
struct mpconf { // configuration table header
u8 signature[4]; // "PCMP"
u16 length; // total table length
u8 version; // [14]
u8 checksum; // all bytes must add up to 0
u8 product[20]; // product id
u32 *oemtable; // OEM table pointer
u16 oemlength; // OEM table length
u16 entry; // entry count
u32 *lapicaddr; // address of local APIC
u16 xlength; // extended table length
u8 xchecksum; // extended table checksum
u8 reserved;
};Abstraction of entries in MP configuration table
1
2
3
4
5
6
7
8
9
struct mpproc { // processor table entry
u8 type; // entry type (0)
u8 apicid; // local APIC id
u8 version; // local APIC verison
u8 flags; // CPU flags
u8 signature[4]; // CPU signature
u32 feature; // feature flags from CPUID instruction
u8 reserved[8];
};Related functions:
1
2
3
4
5
6
7
8
9
10
11
12
13
14
// 在从地址a开始,长度len中寻找MP浮点结构,找到后返回其地址指针
static struct mp* mpsearch1(u32 a, int len)
// 在以下3个地方寻找MP浮点结构
// 1)EBDA(如果存在的话)的第一个KB
// 2)(EBDA不存在的情况下)系统基本内存的最后一个KB
// 3)BIOS ROM的0xF0000到0xFFFFF
static struct mp* mpsearch(void)
//检查MP配置表头并返回其物理地址。
static struct mpconf* mpconfig(struct mp **pmp)
//寻找CPU并存入cpulist中
PUBLIC void mpinit()
3. Key question: where does CPUID come from?
The CPUID in the system can be accessed in two ways:
lapicid is CPUID.
The way to get the lapicid is to call the cpunum function (kernel/lapic.c), which reads the CPUID (lapicid) from the ID register (0xFEE00020) in LAPIC. The lapicid is directly filled into the MPPROC item of the MP configuration table by the BIOS when detecting the MP system. All CPUIDs are derived from the apicid of the struct mpporc. This apicid is assigned by the hardware. Although the LAPIC of all CPUs is mapped at 0xFEE00000 in the memory, it may be due to hardware design that different CPUs see different CPUIDs when accessing the same address of 0xFEE00000.Calculated by the kernel itself.
See lines 19-23 of mpinit. Every time an entry of MPPROC type is found in the MP configuration table, ncpu++, ncpu is the id number of the current CPU, and the id number is stored in struct cpu.
Lab0-2 Copy and execute AP startup program
1. Principle
Multi-core startup, simply put, means that the BSP first completes its own initialization, then copies the startup code of the AP to a fixed location in the memory, and then sends an interprocessor interrupt to wake up the AP to execute this startup code at a fixed location in the memory. After waking up the AP, the BSP will enter the spin waiting state. After the initialization of the AP is completed, the BSP will be notified to unspin, and then the BSP and the AP will execute subsequent procedures in parallel.
2. To do
Newly added file: entryother.asm.
Newly added data structures: None
Newly added function: add startothers function in main.c
Since multi-core booting is an extremely complicated process, this document describes the work done by BSP and AP separately:
- The work of BSP: copy entryother in startothers(), set parameters for the execution of entryother, send interprocessor interrupt SIPI to wake up AP, enter spin and wait for AP to start and end spin.
- The work of AP: execute entryother, complete from real mode to protected mode, and then enter the kernel.
The work done by BSP: execute startothers to wake up the AP.
BSP wakes up AP by startothers. The work of startothers() can be divided into three steps:
- Set the operating parameters for entryother: stack, kernel entry address, page table
- Copy the binary code of entryother and place it at memory address 0x7000
- Send the SIPI start signal to each AP in turn, and wait for each AP to complete the start
1
2
3
4
5
6
7
8
9
10
11
12
13
14
15
16
17
18
19
20
21
22
23
24
25
26
27
28
29
30
void startothers(void)
{
struct cpu *c;
extern cpunumber;//cpu总数
extern u32 _binary_kernel_entryother_bin_start[], _binary_kernel_entryother_bin_size[];
u32 ap_boot_addr = 0x7000; //物理内存的0x7000固定为AP的启动地址
//第一步:为entryother设置运行参数:堆栈、内核入口地址、页表
//1>把堆栈放在0x7000-4的位置
u32 ap_stack= do_kmalloc_4k();
ap_stack = ap_stack + num_4K - num_4B + 0xc0000000;
*(u32 *)(ap_boot_addr - 4) = ap_stack;
//2>把mpenter入口地址放在0x7000-8的位置
*(u32 *)(ap_boot_addr - 8) = mpenter;
//3>把页目录表首地址放在0x7000-12的位置
u32 bsp_cr3 = read_cr3();
*(u32 *)(ap_boot_addr - 12) = bsp_cr3;
//第二步:拷贝entryother的二进制代码,放置到内存地址0x7000处
memcpy(ap_boot_addr, _binary_kernel_entryother_bin_start, _binary_kernel_entryother_bin_size);
//第三步:BSP依次向各个AP发送SIPI启动信号,并等待每个AP完成启动
for(c = cpulist + 1; c < cpulist + cpunumber; c++) {
lapicstartap(c->id, ap_boot_addr); //BSP向AP发送SIPI启动信号
while(c->started == 0) ; //延迟,等待AP完成mpenter
}
}The AP startup parameters placed here refer to three: AP stack base address, AP temporary page mechanism base address and AP entry C function address. in:
- AP stack: BSP applies for a 4KB kernel page as the AP stack through kmalloc, and then places the base address of this stack in the physical memory (0x7000-4).
- AP temporary page mechanism: Since the AP can temporarily share a set of page mechanism with the BSP base address, and the AP already has a stack at this time, it can call the kernel C function. So the “temporary” here refers to the page mechanism of BSP itself. The base address of the page mechanism is obtained through read_cr3, and then the BSP places the base address of the page mechanism (the base address of the page directory table) in the physical memory (0x7000-12).
- AP entry C function mpenter: Since mpenter is a kernel C function, BSP directly places the mpenter function name, that is, the function entry address, in the physical memory (0x7000-8).
The work done by AP: Execute entryother.asm to complete its own startup and jump into the kernel.
Mainly modeled on loader.asm. entryother.asm does the following:
Preparations before entering protection mode: AP establishes temporary GDT, loads gdtr, disables interrupts, opens address line A20, and jumps into protection mode.
Create a temporary GDT:
1
2
3
4
5
6
7
8
9
10
11
12
13
14
15
16
17
; GDT ---------------------------------------------------------------------
;段基址 段界限 属性
LABEL_GDT: Descriptor 0,0, 0 ; 空描述符
LABEL_DESC_FLAT_C: Descriptor 0,0fffffh, DA_CR|DA_32|DA_LIMIT_4K ; 0 ~ 4G
LABEL_DESC_FLAT_RW: Descriptor 0,0fffffh, DA_DRW|DA_32|DA_LIMIT_4K ; 0 ~ 4G
LABEL_DESC_VIDEO: Descriptor 0B8000h,0ffffh,DA_DRW ;显存首地址
; GDT ---------------------------------------------------------------------
GdtLen equ $ - LABEL_GDT
GdtPtr dw GdtLen - 1 ; 段界限
dd BaseOfEntryother + LABEL_GDT ; 基地址
; GDT 选择子 ---------------------------------------------------------------
SelectorFlatC equ LABEL_DESC_FLAT_C - LABEL_GDT
SelectorFlatRW equ LABEL_DESC_FLAT_RW - LABEL_GDT
SelectorVideo equ LABEL_DESC_VIDEO - LABEL_GDT
; GDT 选择子 ----------------------------------------------------------------Load gdtr, turn off interrupt, turn on address line A20, jump into protected mode:
1
2
3
4
5
6
7
8
9
10
11
12
13
14
15
16
17
18
19
20
21
22
23
24
ap_start:
mov ax, cs
mov ds, ax
mov es, ax
mov ss, ax
; 加载 GDTR
lgdt [GdtPtr]
; 关中断
cli
; 打开地址线A20
in al, 92h
or al, 00000010b
out 92h, al
; 准备切换到保护模式
mov eax, cr0
or eax, 1
mov cr0, eax
; 真正进入保护模式
jmp dword SelectorFlatC :(BaseOfEntryother + LABEL_SEG_CODE32)
Between entering the protection mode and entering the kernel: AP sets its own startup parameters
1
2
3
4
5
6
7
8
9
10
11
12
13
14
15
16
17
18
19
20
21
22
23
24
25
26
27
LABEL_SEG_CODE32:
mov ax, SelectorVideo
mov gs, ax ; 视频段选择子(目的)
mov ax, SelectorFlatRW
mov ds, ax
mov es, ax
mov ss, ax
;在(BaseOfEntryother-12)的位置找到cr3
;暂时设置页映射——直接和BSP共用一套页机制
mov eax, [BaseOfEntryother - 12]
mov cr3, eax
;打开页机制开关
mov eax, cr0
or eax, 80000000h
mov cr0, eax
;在(BaseOfEntryother-8)的位置找到堆栈的首地址,设置堆栈
mov esp, [BaseOfEntryother - 4]
;在(BaseOfEntryother-8)的位置找到mpenter函数的入口地址
mov eax, [BaseOfEntryother - 8]
call eax ;跳入内核的mpenter函数
jmp $ ; 到此停止
Lab0-3 Design of AP entry function
1. Principle
After the AP enters the protected mode, the next step is to enter the operating system kernel. Before entering the kernel, some preparatory work is still required, including initializing the GDT, stack, and page table used by the AP itself, and then jumping into the kernel through an entry C function mpenter. After entering the kernel, the AP needs to replace the temporary data structure (temporary GDT, temporary page table, etc.) previously used in entryother.asm with a kernel data structure, that is, create its own kernel data structure. The first kernel system process can then be started.
2. To do
Mpenter is a function that all APs must execute, and the above functions are executed sequentially in mpenter:
- Reset the AP’s page mechanism (AP initializes its own page table)
- P initializes its own LAPIC. Just call lapicinit().
- Copy GDT. Each CPU has its own GDT.
- Initialize the IDT. All CPUs share one IDT, so the function to initialize IDT is very simple, just use lidt.
1 | void mpenter(void) |
AP replaces the temporary data structure (temporary GDT, temporary page table, etc.) used in entryother with the kernel data structure, and calls the restart_initial function to complete the startup of the first system process.