Lab3-1 initial process
1. Principle
Each CPU has its own process number 0 and process number 1. In AempOS, it is reflected that each CPU has its own initial process and init process, and the initial process loads the init process through the method of exec(“init.bin”).
2. To do
Since a series of loading processes of the initial process and the init process have been implemented in v1.2.7, adding the initial process for another CPU in the MP system only needs to “follow the gourd and paint the scoop”.
Imitate initial() in
ktest.cand add initial1()1
2
3
4
5
6
7
8
9void initial1()
{
int i, j;
while (1)
{
disp_str("I1 ");
milli_delay(100);
}
}Imitate
init.candinitstart.asmin the init folder, add two filesinit1.candinitstart1.asm.In
boot/include/load.inc, imitate the writing of init, and set the fixed memory address of loading init1 to 0x8e00.1
2
3
4
5
6
7
8
9BaseOfEchoFile equ 07E0h ; ECHO.BIN 被加载到的位置 ---- 段地址
OffsetOfEchoFile equ 0h ; ECHO.BIN 被加载到的位置 ---- 偏移地址
;08E0h这个地址是我随便选的,用于加载cpu1的init1
BaseOfInit1File equ 08E0h ; INIT1.BIN 被加载到的位置 ---- 段地址
OffsetOfInit1File equ 0h ; INIT1.BIN 被加载到的位置 ---- 偏移地址
BaseOfEchoFilePhyAddr equ BaseOfEchoFile * 10h
BaseOfInit1FilePhyAddr equ BaseOfInit1File * 10hImitate the assembly code of loading init.bin in
boot/loader.asm, and add the assembly code of loading init1.bin.1
2
3
4
5
6
7
8
9
10
11
12
13
14
15
16
17
18
19
20
21
22
23
24
25
26
27
28
29
30
31
32
33
34
35
36
37
38
39
40
41
42
43
44
45
46
47
48
49
50
51
52
53
54
55
56
57
58
59
60
61
62
63
64
65
66
67
68
69
70
71
72
73
74
75
76
77
78
79
80
81
82
83
84
85
86
87
88
89
90
91
92
93
94
95
96
97
98
99
100
101
102
103
104
105
106
107
108
109
110
111
112
113EchoFileName db "INIT BIN", 0 ; INIT.BIN 之文件名
Init1FileName db "INIT1 BIN", 0 ;INIT1.BIN之文件名 ;added by mingxuan 2019-3-7
;added begin added by mingxuan 2019-3-7
INIT1_LABEL_START: ; <--- 从这里开始 *************
mov ax, cs
mov ds, ax
mov es, ax
mov ss, ax
mov sp, BaseOfStack
mov dh, 3 ; "exLoading"
call DispStrRealMode ; 显示字符串
; 下面在 A 盘的根目录寻找
mov word [wSectorNo], SectorNoOfRootDirectory
xor ah, ah ; ┓
xor dl, dl ; ┣ 软驱复位
int 13h ; ┛
INIT1_LABEL_SEARCH_IN_ROOT_DIR_BEGIN:
cmp word [wRootDirSizeForLoop], 0 ; ┓
jz INIT1_LABEL_NO_ECHO ; ┣ 判断根目录区是不是已经读完, 如果读完表示没有找到 ECHO
dec word [wRootDirSizeForLoop] ; ┛
mov ax, BaseOfInit1File
mov es, ax ; es <- BaseOfInit1File
mov bx, OffsetOfInit1File ; bx <- OffsetOfInit1File 于是, es:bx = BaseOfInit1File:OffsetOfInit1File = BaseOfInit1File * 10h + OffsetOfInit1File
mov ax, [wSectorNo] ; ax <- Root Directory 中的某 Sector 号
mov cl, 1
call ReadSector
mov si, Init1FileName ; ds:si -> "echo bin"
mov di, OffsetOfInit1File ; es:di -> BaseOfInit1File:???? = BaseOfInit1File*10h+????
cld
mov dx, 10h
INIT1_LABEL_SEARCH_FOR_ECHO:
cmp dx, 0 ; ┓
jz INIT1_LABEL_GOTO_NEXT_SECTOR_IN_ROOT_DIR ; ┣ 循环次数控制, 如果已经读完了一个 Sector, 就跳到下一个 Sector
dec dx ; ┛
mov cx, 11
INIT1_LABEL_CMP_FILENAME:
cmp cx, 0 ; ┓
jz INIT1_LABEL_FILENAME_FOUND; ┣ 循环次数控制, 如果比较了 11 个字符都相等, 表示找到
dec cx ; ┛
lodsb ; ds:si -> al
cmp al, byte [es:di] ; if al == es:di
jz INIT1_LABEL_GO_ON
jmp INIT1_LABEL_DIFFERENT
INIT1_LABEL_GO_ON:
inc di
jmp INIT1_LABEL_CMP_FILENAME ; 继续循环
INIT1_LABEL_DIFFERENT:
and di, 0FFE0h ; else┓ 这时di的值不知道是什么, di &= e0 为了让它是 20h 的倍数
add di, 20h ; ┃
mov si, Init1FileName ; ┣ di += 20h 下一个目录条目
jmp INIT1_LABEL_SEARCH_FOR_ECHO ; ┛
INIT1_LABEL_GOTO_NEXT_SECTOR_IN_ROOT_DIR:
add word [wSectorNo], 1
jmp INIT1_LABEL_SEARCH_IN_ROOT_DIR_BEGIN
INIT1_LABEL_NO_ECHO:
mov dh, 5 ; "No ECHO "
call DispStrRealMode ; 显示字符串
jmp $ ; 没有找到 echo, 死循环在这里
INIT1_LABEL_FILENAME_FOUND: ; 找到 echo 后便来到这里继续
mov ax, RootDirSectors
and di, 0FFF0h ; di -> 当前条目的开始
push eax
mov eax, [es : di + 01Ch] ; ┓
mov dword [_dwEchoSize], eax ; ┛保存 echo 文件大小
pop eax
add di, 01Ah ; di -> 首 Sector
mov cx, word [es:di]
push cx ; 保存此 Sector 在 FAT 中的序号
add cx, ax
add cx, DeltaSectorNo ; 这时 cl 里面是 echo 的起始扇区号 (从 0 开始数的序号)
mov ax, BaseOfInit1File
mov es, ax ; es <- BaseOfInit1File
mov bx, OffsetOfInit1File ; bx <- OffsetOfInit1File 于是, es:bx = BaseOfInit1File:OffsetOfInit1File = BaseOfInit1File * 10h + OffsetOfInit1File
mov ax, cx ; ax <- Sector 号
INIT1_LABEL_GOON_LOADING_FILE:
push ax ; ┓
push bx ; ┃
mov ah, 0Eh ; ┃ 每读一个扇区就在 "exLoading" 后面打一个点, 形成这样的效果:
mov al, '.' ; ┃
mov bl, 0Fh ; ┃ exLoading......
int 10h ; ┃
pop bx ; ┃
pop ax ; ┛
mov cl, 1
call ReadSector
pop ax ; 取出此 Sector 在 FAT 中的序号
call GetFATEntry
cmp ax, 0FFFh
jz INIT1_LABEL_FILE_LOADED
push ax ; 保存 Sector 在 FAT 中的序号
mov dx, RootDirSectors
add ax, dx
add ax, DeltaSectorNo
add bx, [BPB_BytsPerSec]
jmp INIT1_LABEL_GOON_LOADING_FILE
INIT1_LABEL_FILE_LOADED:
call KillMotor ; 关闭软驱马达
mov dh, 4 ; "exReady."
call DispStrRealMode ; 显示字符串Add a judgment statement based on cpuid in the fake_read function in
file.c.1
2
3
4
5
6
7
8
9
10
11
12
13
14
15
16
17
PUBLIC u32 fake_read (u32 fd,void* buffer,u32 size)
{
u32 addr_lin=0;
switch (cpu->id)
{
case 0: addr_lin = BaseOfEchoFilePhyAddr + position; break; //cpu0的init进程
case 1: addr_lin = BaseOfInit1FilePhyAddr + position; break; //cpu1的init1进程
default: break;
}
position += size;
memcpy(buffer,(void*)addr_lin,size);
return 0;
}
Lab3-2 Ready queue
1. Principle
In the original single-core AempOS-v1.2.6, the process scheduling strategy is to directly search the proc_table sequentially, and execute each process in turn, thereby realizing process scheduling. In reality, process scheduling is much more complicated. For multi-core process scheduling, in order to ensure compatibility with the AempOS-v1.2.6 scheduler, a very important question is: how to ensure that multiple CPUs search for a common proc_table without making mistakes? That is to establish its own ready queue for each cpu.
Specifically in:
When each CPU needs to be scheduled, it searches its own ready queue and obtains a process for execution each time. Regarding the details of process switching, Dong Xuwei’s document has already described it in detail, so I won’t describe it here.
When a process on a certain CPU executes fork/pthread, the created child process/thread will be directly added to the ready queue of the CPU.
Modify it so that each CPU corresponds to one init. The processes/threads created by fork/pthread in their respective init will be inserted into their own ready queue.
2. To do
Add a ready queue for each CPU
The so-called ready queue is currently designed as a one-way linked list in AempOS. The struct cpu contains the head pointer and tail pointer of the linked list, and the node of the linked list contains a pointer of PROCESS type, pointing to an entry in proc_table. Another variable nr_ready_proc in struct cpu is used for subsequent multi-core load balancing.1
2
3
4
5
6
7
8
9
10
11
12
13
14
15
16struct ready_proc {
PROCESS *proc;
struct ready_proc *next;
};
struct ready_queue {
struct ready_proc *front; //就绪队列的头指针
struct ready_proc *rear; //就绪队列的尾指针
};
struct cpu {
// ...
struct ready_queue ready;
int nr_ready_proc; //当前就绪队列中进程的总数
// ...
};There are also corresponding initialization, insertion and deletion operations for the ready queue:
initialization:1
2
3void init_ready_queue(struct ready_queue *rq) {
rq->front = rq->rear = NULL;
}insert:
1
2
3
4
5
6
7
8
9
10
11
12
13
14
15
16void add_ready_queue(struct ready_queue *rq, PROCESS *p_proc) {
struct ready_proc *p;
p = (struct ready_proc *)K_PHY2LIN(do_kmalloc(sizeof(struct ready_proc)))
p->proc = p_proc;
p->next = NULL;
p->prev = NULL;
if(rq->rear == NULL) //原先的队列为空
rq->front = rq->rear = p;
else {
p->prev = rq->rear;
rq->rear->next = p;
rq->rear = p;
}
}delete:
1
2
3
4
5
6
7
8
9
10
11
12
13int remove_ready_queue(struct ready_queue *rq, struct ready_proc **p) {
if(rq->rear == NULL)
return 0; //empty
if(rq->front == rq->rear) //only one node
rq->front = rq->rear = NULL;
else
rq->front = rq->front->next;
do_free(p);
return 1;
}Adjust the process initialization layout
Modified the situation where there is only one initial in AempOS-v1.2.6, extending it to four: initial, initial1, initial2, initial3. In order to ensure compatibility with the previous version of the scheduler, the initial process is written to death in proc_table. They occupy the four positions of 0x0, 0x1, 0x2, and 0x3 of proc_table respectively. At the same time, in the init folder, the init is also expanded to 4: init, init1, init2, init3, corresponding to the respective initial to use exec to load.
Lab3-3 Simple Load Balancing
1. Principle
Load balancing is an important function in AempOS, which is responsible for detecting the load of each CPU and maintaining the stability of each CPU’s ready queue.
2. To do
The table below shows the implementation of the load balancing function.
| 函数名称 | 函数参数 | 函数功能 |
|---|---|---|
| load_balance | 无 | 1)从cpulist中找出最繁忙的一个cpu2)从该cpu上迁移几个进程到本cpu上 |
| find_busiest_cpu | 无 | 从cpulist中找出最繁忙的一个cpu |
| move_proc_num | cpu,busiest_cpu | 计算应该迁移多少个进程 |
| move_ready_proc | cpu,busiest_cpu | 从最繁忙的cpu上迁移几个进程到本cpu上 |
The most important function is the load_balance function. In AempOS, the load_balance function is executed periodically by four kernel processes on four CPUs. The figure below is the process scheduling model of AempOS with load balancing function.
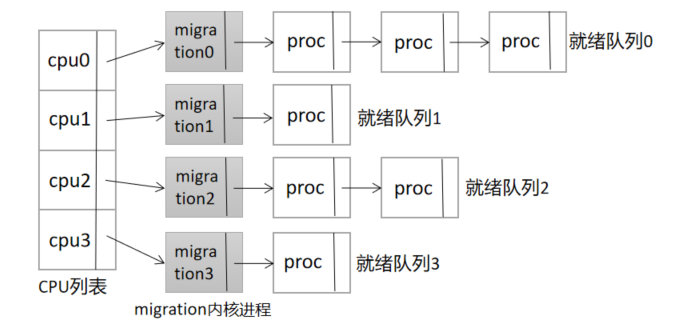
As shown in Figure above, there are four kernel processes named migration in the distribution of the ready queue, which periodically checks the load of the ready queue on each CPU, that is, the number of processes in the ready queue. When the number of processes on a certain CPU is much greater than that of other CPUs, the migration process will call the load_balance function to calculate the appropriate number of processes and transfer the processes from one CPU to another.